
Today I came across a new method of classification using machine learning utilizing a library called dlib. The justification for looking into this method this late into my design is due to the requirement of quickly detecting particular objects within the scene.
The installation of dlib requires a couple of pre-requisites. I used the following guide from Adrian Rosebrock to get it all up and running, but i’ll outline the main issues I had below.
You’ll need python, python3, cmake, boost and boost-python
$ brew install python
$ brew install python3
$ brew install cmake
$ brew install boost
$ brew install boost-python --with-python3
Note that if you had a previously setup OpenCV instance there’s a very good chance that you’re python will be forced to upgrade python to the most recent version. This will mess up your original OpenCV binding… The way you can fix this is to reinstall OpenCV via brew.
Check to confirm that your python installs are setup with brew. I would highly recommend that you don’t install it ontop of the Sierra python interpreter, so make sure it’s setup as per the following.
$ which python
/usr/local/bin/python
$ which python3
/usr/local/bin/python3
Confirm homebrew/science is tapped with brew
$ brew tap homebrew/science
If you have had an install of OpenCV prior to this, you will need to make a slight change to the opencv3 package currently configured with homebrew. The following fix is documented on the following page. Run the following to open the opencv3 configuration.
$ brew edit opencv3
Comment out the following command lines within the opened file
inreplace buildpath/"3rdparty/ippicv/downloader.cmake",
  "${OPENCV_ICV_PLATFORM}-${OPENCV_ICV_PACKAGE_HASH}",
  "${OPENCV_ICV_PLATFORM}"
Now run the following command to install the opencv3 package via brew. If you have an existing install you’ll need to use the –force trigger, if you don’t however there is no harm including it anyway.
$ brew install --force opencv3 --with-contrib --with-python3 --HEAD
Once installed, relink the path to the new site-packages using the following commands for python2.7 and python3.6
$ echo /usr/local/opt/opencv3/lib/python3.6/site-packages >> /usr/local/lib/python3.6/site-packages/opencv3.pth
$ echo /usr/local/opt/opencv3/lib/python2.7/site-packages >> /usr/local/lib/python2.7/site-packages/opencv3.pth
Run the following to confirm that OpenCV 3.2 is installed for both interpreters
$ python
>>> import cv2
>>> cv2.__version__
'3.2.0-dev'

$ python3
>>> import cv2
>>> cv2.__version__
'3.2.0-dev'
Also confirm that virtualenv and virtualenvwrapper is installed for both the newly confirmed interpreters.
$ pip install virtualenv virtualenvwrapper
$ pip3 install virtualenv virtualenvwrapper
Finally double check that you still have the virtualenvwrapper.sh source added to your ~/.bash_profile or ~/.zshrc
# Virtualenv/VirtualenvWrapper
source /usr/local/bin/virtualenvwrapper.sh
Create virtualenv’s for python and python3 for use with OpenCV 3.x
$ mkvirtualenv opencv3.2-python2.7.12
$ mkvirtualenv opencv3.2-python3.6 -p python3
Within these virtualenv’s install dlib (and other useful libraries)
$ workon opencv3.2-python2.7.12

(opencv3.2-python2.7.12) $ pip install numpy
(opencv3.2-python2.7.12) $ pip install scipy
(opencv3.2-python2.7.12) $ pip install scikit-image
(opencv3.2-python2.7.12) $ pip install dlib

$ workon opencv3.2-python3.6.1

(opencv3.2-python3.6.1) $ pip install numpy
(opencv3.2-python3.6.1) $ pip install scipy
(opencv3.2-python3.6.1) $ pip install scikit-image
(opencv3.2-python3.6.1) $ pip install dlib
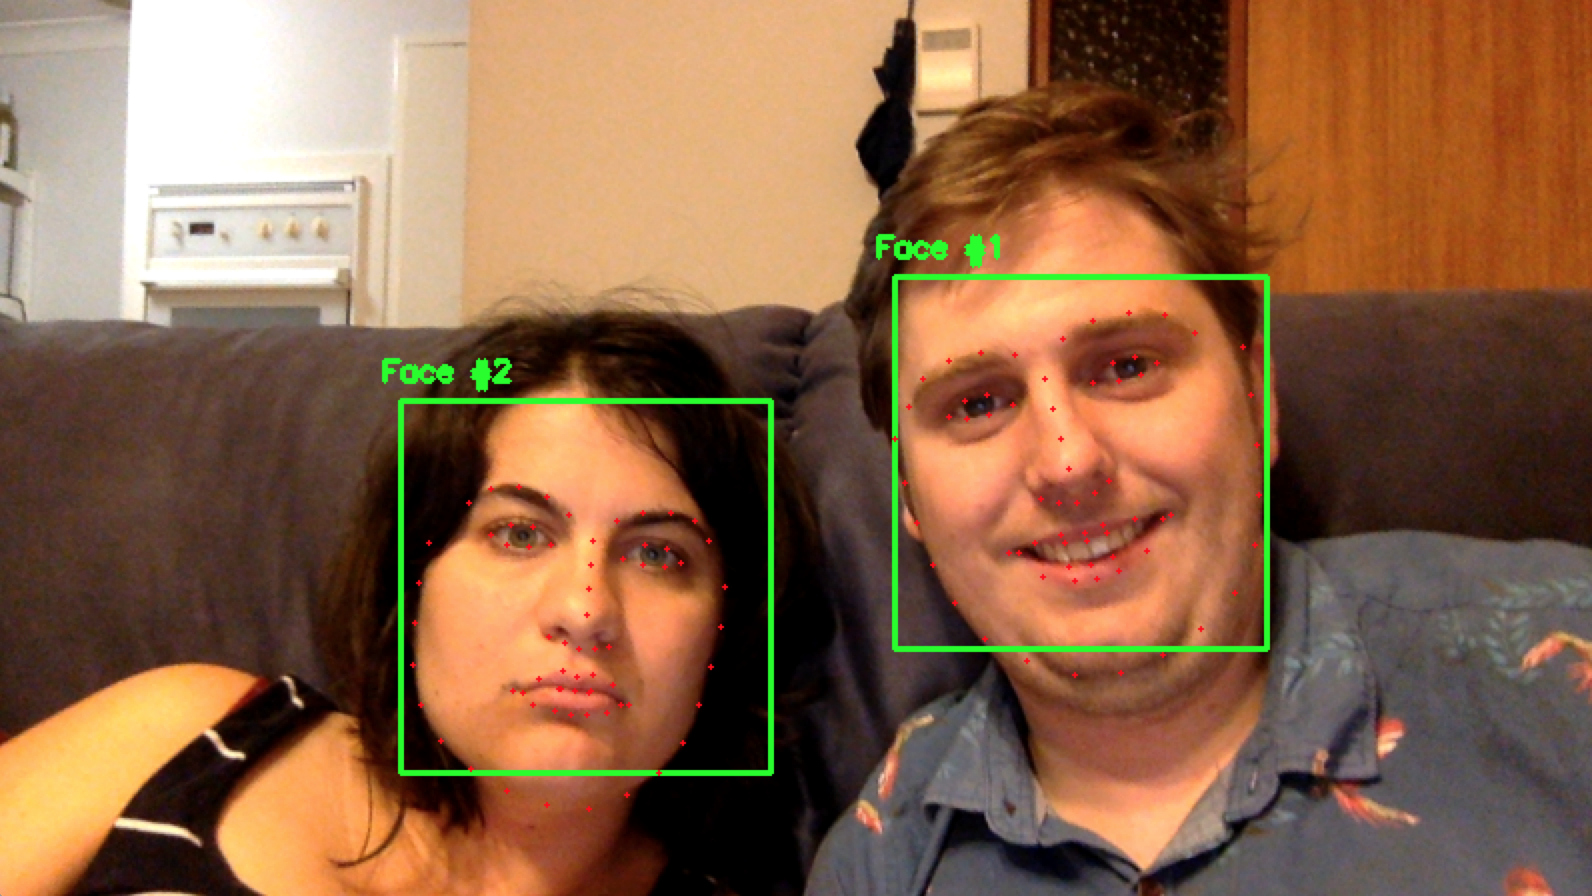
I then proceeded to use an example tutorial from Adrian Rosebrock that detects and maps facial landmarks using a pre-generated classifier for facial detection.
# import the necessary packages
from imutils import face_utils
import numpy as np
import argparse
import imutils
import dlib
import cv2

# construct the argument parser and parse the arguments
ap = argparse.ArgumentParser()
ap.add_argument("-p", "--shape-predictor", required=True,
                help="path to facial landmark predictor")
args = vars(ap.parse_args())

# Video capture source
cap = cv2.VideoCapture(0)

# initialize dlib's face detector (HOG-based) and then create
# the facial landmark predictor
detector = dlib.get_frontal_face_detector()
predictor = dlib.shape_predictor(args["shape_predictor"])

while True:
    # Capture frame-by-frame
    ret, image = cap.read()

    image = imutils.resize(image, width=500)
    gray = cv2.cvtColor(image, cv2.COLOR_BGR2GRAY)

    # detect faces in the grayscale image
    rects = detector(gray, 1)

    # loop over the face detections
    for (i, rect) in enumerate(rects):
        # determine the facial landmarks for the face region, then
        # convert the facial landmark (x, y)-coordinates to a NumPy
        # array
        shape = predictor(gray, rect)
        shape = face_utils.shape_to_np(shape)

        # convert dlib's rectangle to a OpenCV-style bounding box
        # [i.e., (x, y, w, h)], then draw the face bounding box
        (x, y, w, h) = face_utils.rect_to_bb(rect)
        cv2.rectangle(image, (x, y), (x + w, y + h), (0, 255, 0), 2)

        # show the face number
        cv2.putText(image, "Face #{}".format(i + 1), (x - 10, y - 10),
                    cv2.FONT_HERSHEY_SIMPLEX, 0.5, (0, 255, 0), 2)

        # loop over the (x, y)-coordinates for the facial landmarks
        # and draw them on the image
        for (x, y) in shape:
            cv2.circle(image, (x, y), 1, (0, 0, 255), -1)

    # show the output image with the face detections + facial landmarks
    cv2.imshow("Output", image)
    cv2.waitKey(0)
To run the example, use the following command replacing the shape-predictor with the filename you have.
$ python facial_landmarks.py --shape-predictor shape_predictor_68_face_landmarks.dat
You can get the classification file from the dlib website here:
http://dlib.net/files/shape_predictor_68_face_landmarks.dat.bz2
The output you should expect is sometime as shown below. This is just the simple facial landmarks for any detected faces in the input image.
The example above is well and good, but we need a method for hand detection, and the above example only covers facial landscaping. I now needed to investing how to generate my own classifier for hands.
To start with I found a great dataset of hand images on the Mutah website. It has both datasets of high and low quality images.
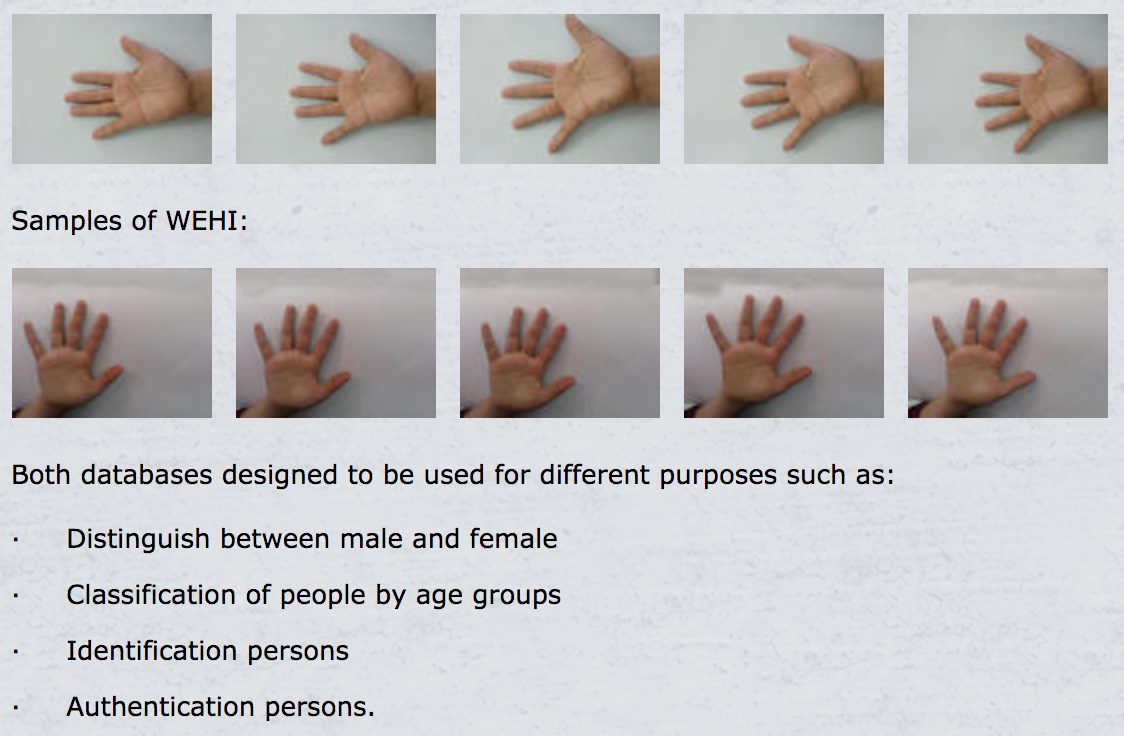
For the case of this post i’ll just be using the low quality images as it will likely suit just fine for what I’m doing.
The next step was to generate the XML file that would be used to generate my classifier. This could be done using the imglab tool available with the dlib repo. In order to use this tool I had to build it from source by using the following pipeline to pull the code repo and make the binary.
$ git clone git@github.com:davisking/dlib.git
$ cd dlib/tools/imglab
$ mkdir build
$ cd build
$ cmake ..
$ cmake --build . --config Release
This will spit out a imglab binary in the dlib/tools/imglab/build directory
I next created a new dlib-training repo that I could use to house all the images and imglab tool chains while I generate my detector.
Within this repo I had the following folders and files:
## Stores images used for classification
/images/

## Stores the imglab binary and other classifier output files
/tools/

## python file used to generate the detector svm file
train_object_detector.py
First thing you’ll need to do is to generate the base XML dataset to be used. This can be done by running the following with the appropriate arguements on the imglab binary.
$ ./imglab -c hand-dataset.xml ../images
This command will generate a file called hand-dataset.xml based on the classifier images within the /images folder.
Next run the following command to open up the graphical interface for the image classification.
$ ./imglab hand-dataset.xml
Still will open up a window that will have a list of all the input images for your classifier and allow you to draw a bounding box and add a label for the boxes to each image.
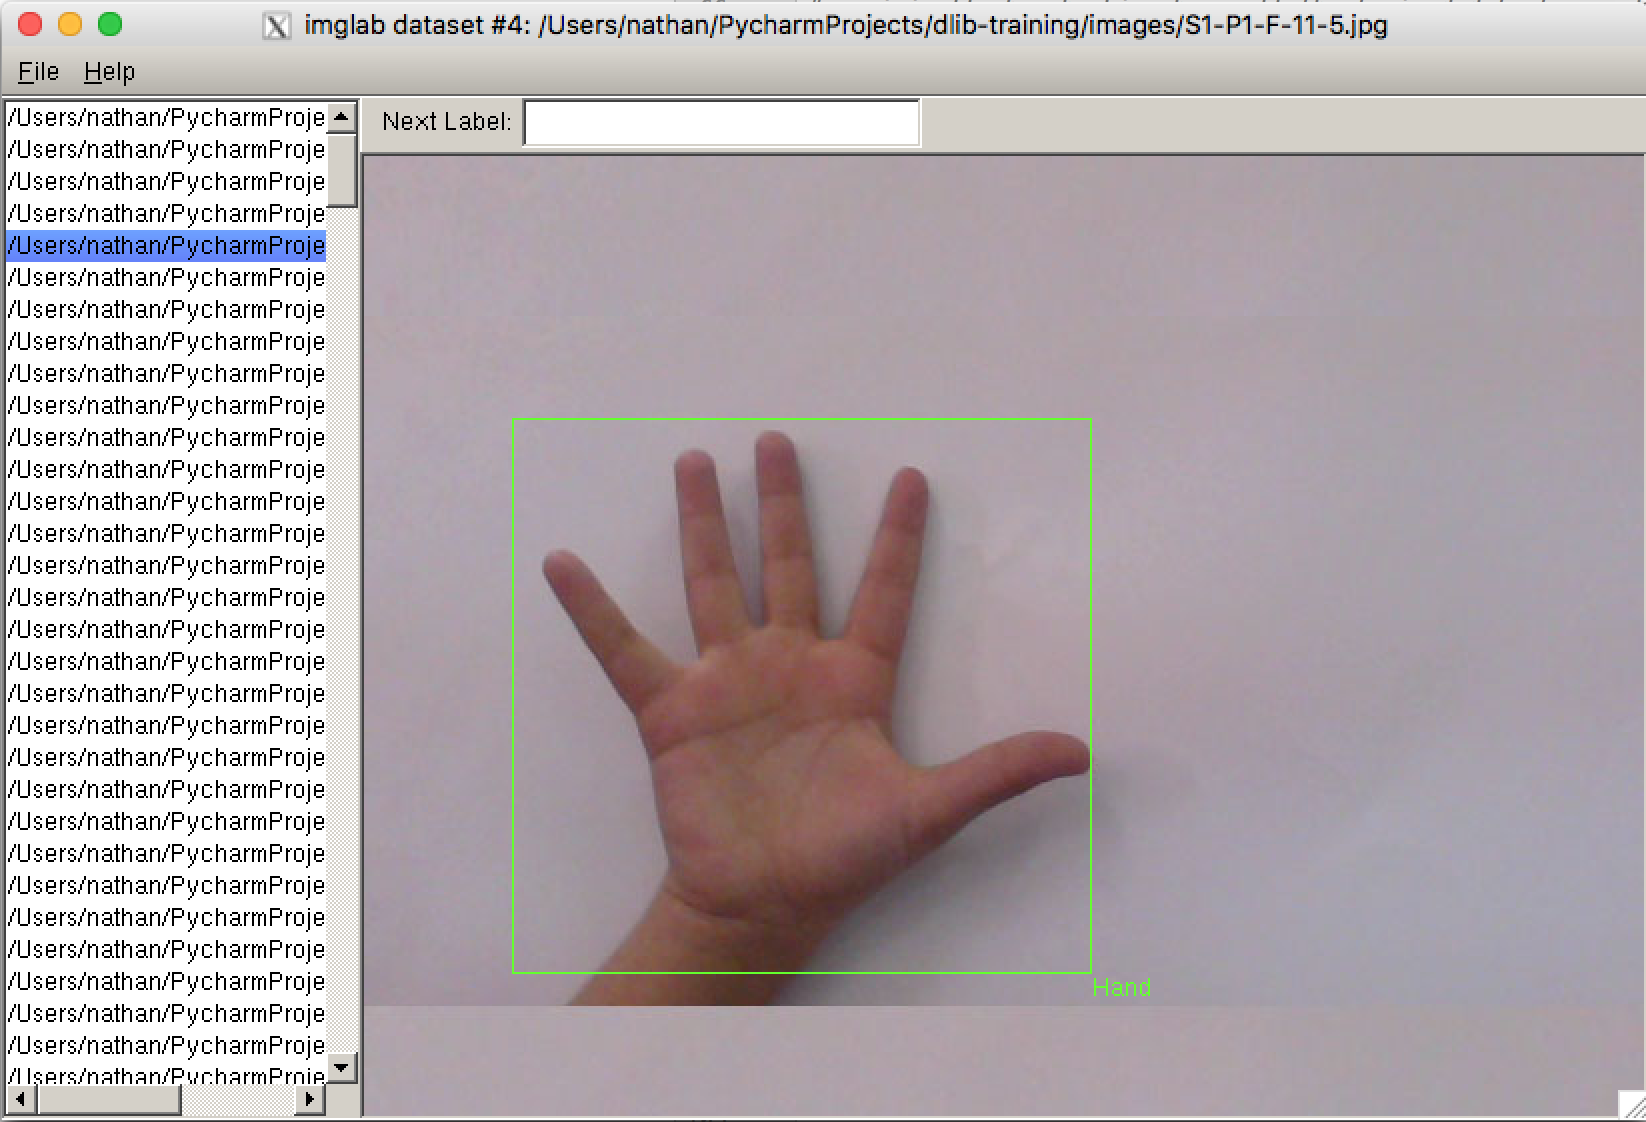
The steps required to manually classify the images can take quite some time, You should enter a name for the next box you are about to draw in the label field on the top and then whilst holding Shift click and drag a box around the important zones in your image.
Then press the Down arrow to go to the next image. This process will take some time, but the more accurate you are whilst doing it the better and more broad your results will be.
Once you’re done, simply File>Save and you’ll original hand-dataset.xml will be modified with the more specific values for each image.
Now make a copy of the hand-dataset.xml and image_metadata_stylesheet.xsl files into the /images folder and run the following python file to generate the final detector.svm classifier
NOTE: this code is documented also at the following URL.
#!/usr/bin/python
# The contents of this file are in the public domain. See LICENSE_FOR_EXAMPLE_PROGRAMS.txt
#
# This example program shows how you can use dlib to make an object
#   detector for things like faces, pedestrians, and any other semi-rigid
#   object.  In particular, we go though the steps to train the kind of sliding
#   window object detector first published by Dalal and Triggs in 2005 in the
#   paper Histograms of Oriented Gradients for Human Detection.
#
#
# COMPILING/INSTALLING THE DLIB PYTHON INTERFACE
#   You can install dlib using the command:
#       pip install dlib
#
#   Alternatively, if you want to compile dlib yourself then go into the dlib
#   root folder and run:
#       python setup.py install
#   or
#       python setup.py install --yes USE_AVX_INSTRUCTIONS
#   if you have a CPU that supports AVX instructions, since this makes some
#   things run faster.
#
#   Compiling dlib should work on any operating system so long as you have
#   CMake and boost-python installed.  On Ubuntu, this can be done easily by
#   running the command:
#       sudo apt-get install libboost-python-dev cmake
#
#   Also note that this example requires scikit-image which can be installed
#   via the command:
#       pip install scikit-image
#   Or downloaded from http://scikit-image.org/download.html.

import os
import sys
import glob

import dlib
from skimage import io


# In this example we are going to train a face detector based on the small
# faces dataset in the examples/faces directory.  This means you need to supply
# the path to this faces folder as a command line argument so we will know
# where it is.
if len(sys.argv) != 2:
    print(
        "Give the path to the examples/faces directory as the argument to this "
        "program. For example, if you are in the python_examples folder then "
        "execute this program by running:\n"
        "    ./train_object_detector.py ../examples/faces")
    exit()
faces_folder = sys.argv[1]


# Now let's do the training.  The train_simple_object_detector() function has a
# bunch of options, all of which come with reasonable default values.  The next
# few lines goes over some of these options.
options = dlib.simple_object_detector_training_options()
# Since faces are left/right symmetric we can tell the trainer to train a
# symmetric detector.  This helps it get the most value out of the training
# data.
options.add_left_right_image_flips = True
# The trainer is a kind of support vector machine and therefore has the usual
# SVM C parameter.  In general, a bigger C encourages it to fit the training
# data better but might lead to overfitting.  You must find the best C value
# empirically by checking how well the trained detector works on a test set of
# images you haven't trained on.  Don't just leave the value set at 5.  Try a
# few different C values and see what works best for your data.
options.C = 5
# Tell the code how many CPU cores your computer has for the fastest training.
options.num_threads = 4
options.be_verbose = True


training_xml_path = os.path.join(faces_folder, "hand-dataset.xml")
testing_xml_path = os.path.join(faces_folder, "testing.xml")
# This function does the actual training.  It will save the final detector to
# detector.svm.  The input is an XML file that lists the images in the training
# dataset and also contains the positions of the face boxes.  To create your
# own XML files you can use the imglab tool which can be found in the
# tools/imglab folder.  It is a simple graphical tool for labeling objects in
# images with boxes.  To see how to use it read the tools/imglab/README.txt
# file.  But for this example, we just use the training.xml file included with
# dlib.
dlib.train_simple_object_detector(training_xml_path, "detector.svm", options)


# Now that we have a face detector we can test it.  The first statement tests
# it on the training data.  It will print(the precision, recall, and then)
# average precision.
print("")  # Print blank line to create gap from previous output
print("Training accuracy: {}".format(
    dlib.test_simple_object_detector(training_xml_path, "detector.svm")))
# However, to get an idea if it really worked without overfitting we need to
# run it on images it wasn't trained on.  The next line does this.  Happily, we
# see that the object detector works perfectly on the testing images.
print("Testing accuracy: {}".format(
    dlib.test_simple_object_detector(testing_xml_path, "detector.svm")))
This process will take quite some time depending on how many images you are using. Just be patient, you’ll see an output similar to the following for each iteration.
Training with C: 5
Training with epsilon: 0.01
Training using 4 threads.
Training with sliding window 78 pixels wide by 82 pixels tall.
Training on both left and right flipped versions of images.
objective:     148.947
objective gap: 148.941
risk:          29.7882
risk gap:      29.7882
num planes:    3
iter:          1

objective:     28.1685
objective gap: 28.0654
risk:          5.61313
risk gap:      5.61308
num planes:    4
iter:          2

objective:     31.862
objective gap: 31.6868
risk:          6.33742
risk gap:      6.33735
num planes:    5
iter:          3
Now that we have our detector.svm we can use it to setup a very simple detector using the following python code.
import imutils
import dlib
import cv2

# Now let's use the detector as you would in a normal application.  First we
# will load it from disk.
detector = dlib.simple_object_detector("detector.svm")

# Video capture source
cap = cv2.VideoCapture(0)

# We can look at the HOG filter we learned.  It should look like a face.  Neat!
win_det = dlib.image_window()
win_det.set_image(detector)

win = dlib.image_window()

while True:

    ret, image = cap.read()
    image = imutils.resize(image, width=800)

    rects = detector(image)

    for k, d in enumerate(rects):
        print("Detection {}: Left: {} Top: {} Right: {} Bottom: {}".format(
            k, d.left(), d.top(), d.right(), d.bottom()))

    win.clear_overlay()
    win.set_image(image)
    win.add_overlay(rects)
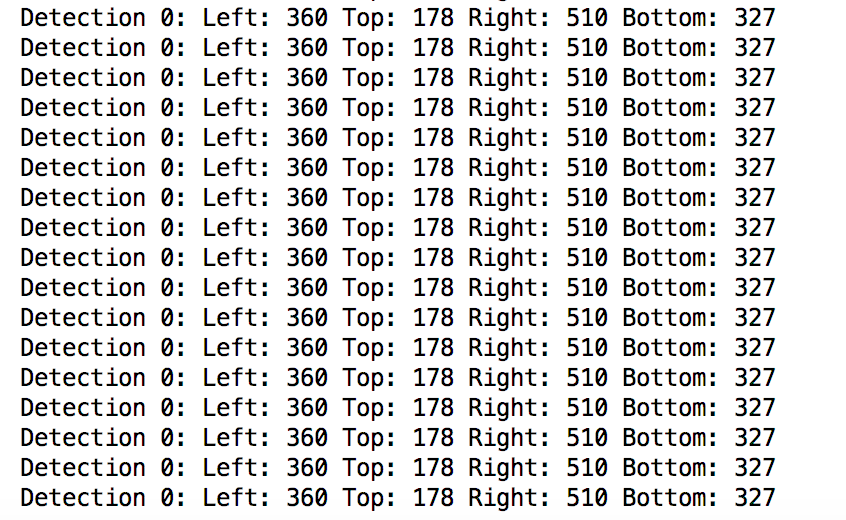
The output can be seen below and is fairly successful.
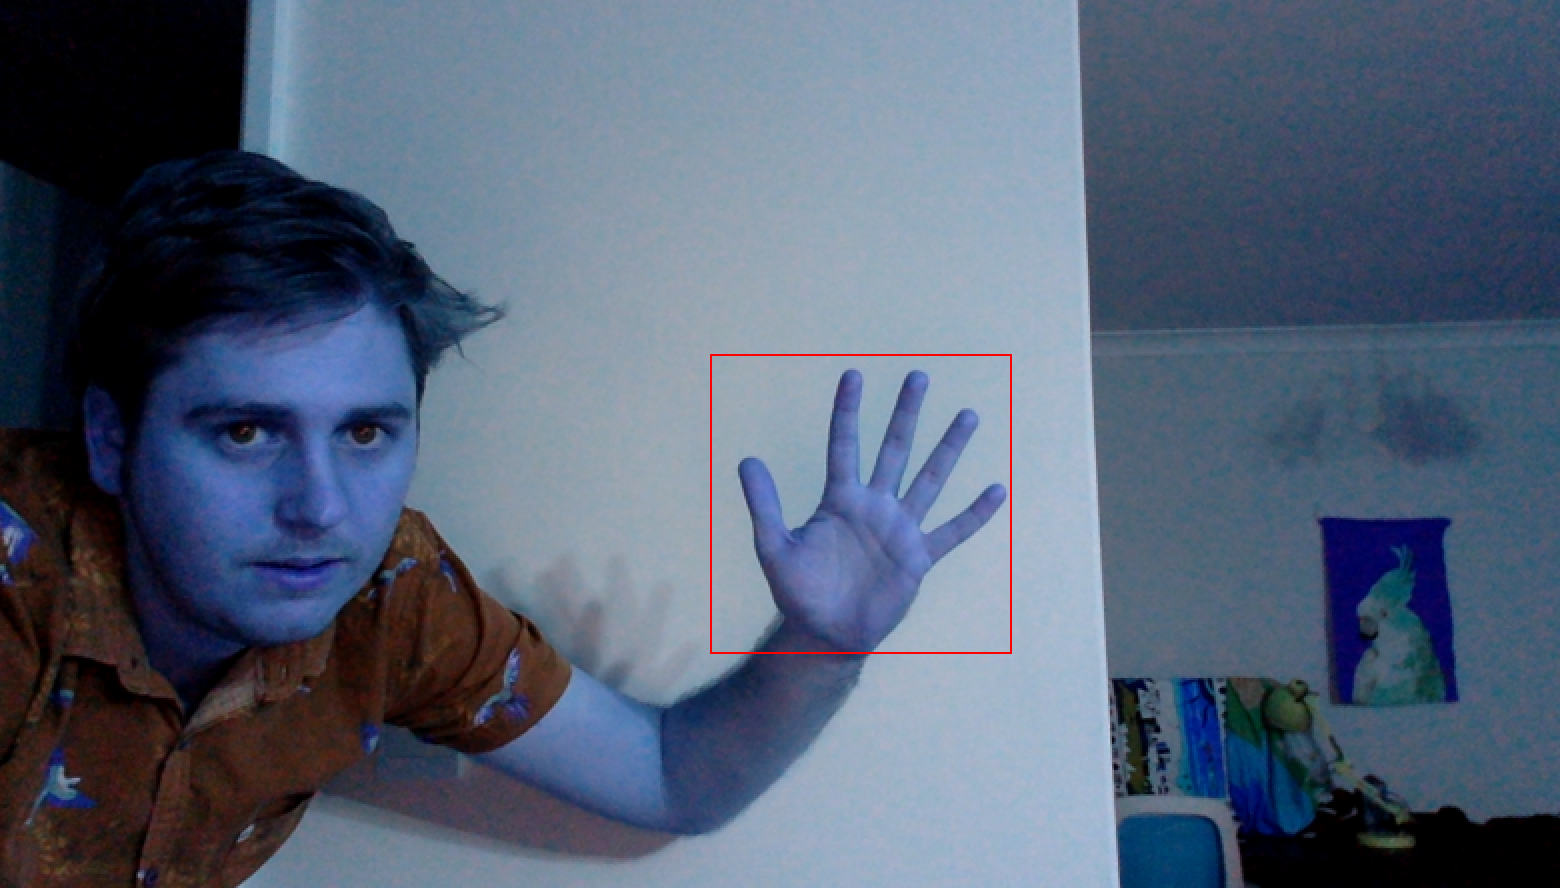
You can also see that the position of the detected object is output in the terminal
Facial landmarks with dlib, OpenCV, and Python - http://www.pyimagesearch.com/2017/04/03/facial-landmarks-dlib-opencv-python/
Hand Images Databases - https://www.mutah.edu.jo/biometrix/hand-images-databases.html
dlib Training Object Detector - http://dlib.net/train_object_detector.py.html