Today while trying to bring all the various components I have so far together, I discovered another important aspect I needed to investigate in order for all this work to be worthwhile. Measurement and scale of the data I capture! It’s all well and good to detect a hand in am image and draw lines from the center of the hand, but that information will be pretty useless without accurate measurements of those lines.
The idea for this system is based loosely on the image below
The sensor box will sit on the hand and will be defined as a constant size. This means that we can use the sensor as our scaling index for measuring how far and how long different points on the hand are.
Below are a list of requirements the measurement system needs to meet:
We need a way to find the object we are going to be using for scaling; in this case it is obviously our blue (or yellow sensor). This will likely be done using one of the previously outlined methods from my previous posts; RGB & HSV detection.
The implementation for this concept has already been outlined in another great tutorial by Adrian Rosebrock.
First he loads in the image, converts it to grayscale and blurs is slightly.
image = cv2.imread(args["image"])
gray = cv2.cvtColor(image, cv2.COLOR_BGR2GRAY)
gray = cv2.GaussianBlur(gray, (7, 7), 0)
Next edge detection (Canny) is performed on the grayscale image; followed by 1 iteration of dialation and erotion to remove any background noise.
edged = cv2.Canny(gray, 50, 100)
edged = cv2.dilate(edged, None, iterations=1)
edged = cv2.erode(edged, None, iterations=1)
The contours are found in the edge detection map from before.
cnts = cv2.findContours(edged.copy(), cv2.RETR_EXTERNAL,
                        cv2.CHAIN_APPROX_SIMPLE)
cnts = cnts[0] if imutils.is_cv2() else cnts[1]
The contours are sorted left to right, meaning that for this example the LEFT-most object is used as our scale.
(cnts, _) = contours.sort_contours(cnts)
colors = ((0, 0, 255), (240, 0, 159), (0, 165, 255), (255, 255, 0),
          (255, 0, 255))
refObj = None
Now each contour is looped over; if it doesn’t extend to a large enough size it is ignored. We also compute tha bounding box around the large contoured mass and draw a point in the top-left, top right, bottom left and bottom right of the mass. We finally compute the center point of the box
for c in cnts:
    if cv2.contourArea(c) < 100:
        continue

    box = cv2.minAreaRect(c)
    box = cv2.cv.BoxPoints(box) if imutils.is_cv2() else cv2.boxPoints(box)
    box = np.array(box, dtype="int")

    box = perspective.order_points(box)

    cX = np.average(box[:, 0])
    cY = np.average(box[:, 1])
If the contour we’re examining is the first (left most), then it is the reference object for our scale. We compute the middle point of this object and then compute the Euclidean distance between the middle points to construct a new reference object.
if refObj is None:
    (tl, tr, br, bl) = box
    (tlblX, tlblY) = midpoint(tl, bl)
    (trbrX, trbrY) = midpoint(tr, br)

    D = dist.euclidean((tlblX, tlblY), (trbrX, trbrY))
    refObj = (box, (cX, cY), D / args["width"])
    continue
We draw the contours onto the image and stack the reference coordinates and the object we’re examining coordinates for use in the next part.
orig = image.copy()
cv2.drawContours(orig, [box.astype("int")], -1, (0, 255, 0), 2)
cv2.drawContours(orig, [refObj[0].astype("int")], -1, (0, 255, 0), 2)

refCoords = np.vstack([refObj[0], refObj[1]])
objCoords = np.vstack([box, (cX, cY)])
Finally we use the reference coordinates and the object coordinates to compute and display distance vectors from each of the reference objects corners to the respective corner on the object we found, using the reference distance to calculate the accurate scaled distance.
# loop over the original points
for ((xA, yA), (xB, yB), color) in zip(refCoords, objCoords, colors):
    # draw circles corresponding to the current points and
    # connect them with a line
    cv2.circle(orig, (int(xA), int(yA)), 5, color, -1)
    cv2.circle(orig, (int(xB), int(yB)), 5, color, -1)
    cv2.line(orig, (int(xA), int(yA)), (int(xB), int(yB)),
             color, 2)

    # compute the Euclidean distance between the coordinates,
    # and then convert the distance in pixels to distance in
    # units
    D = dist.euclidean((xA, yA), (xB, yB)) / refObj[2]
    (mX, mY) = midpoint((xA, yA), (xB, yB))
    cv2.putText(orig, "{:.1f}in".format(D), (int(mX), int(mY - 10)),
                cv2.FONT_HERSHEY_SIMPLEX, 0.55, color, 2)

    # show the output image
    cv2.imshow("Image", orig)
    cv2.waitKey(0)
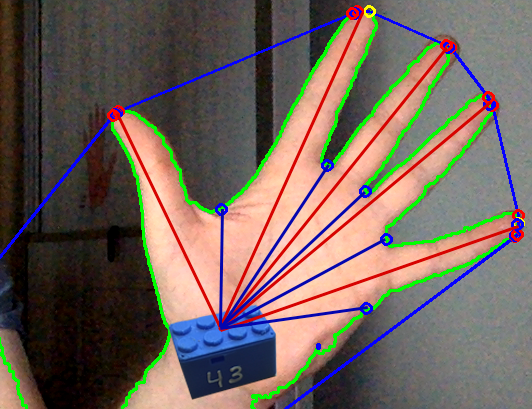
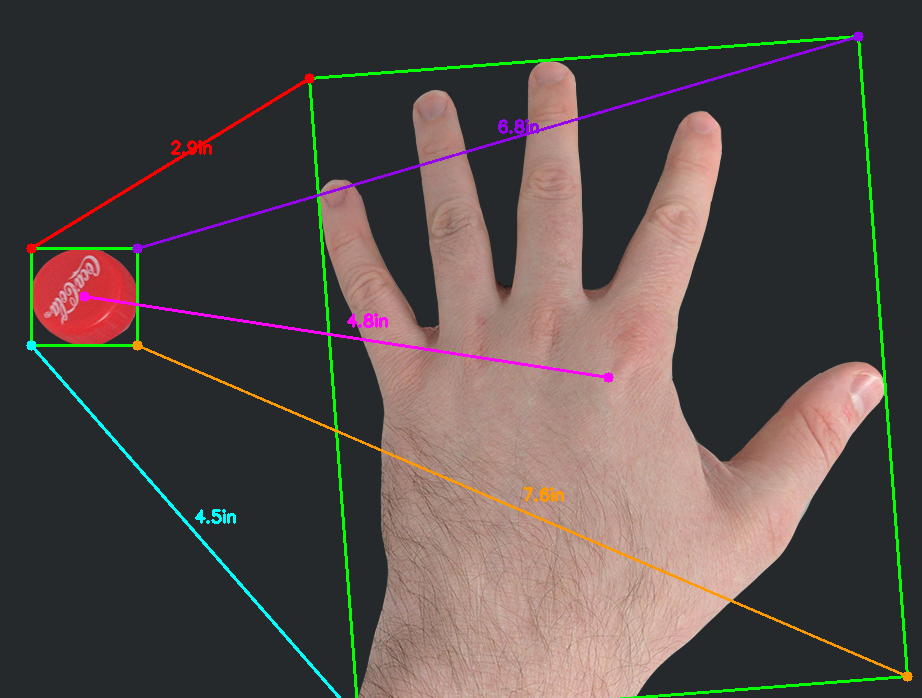
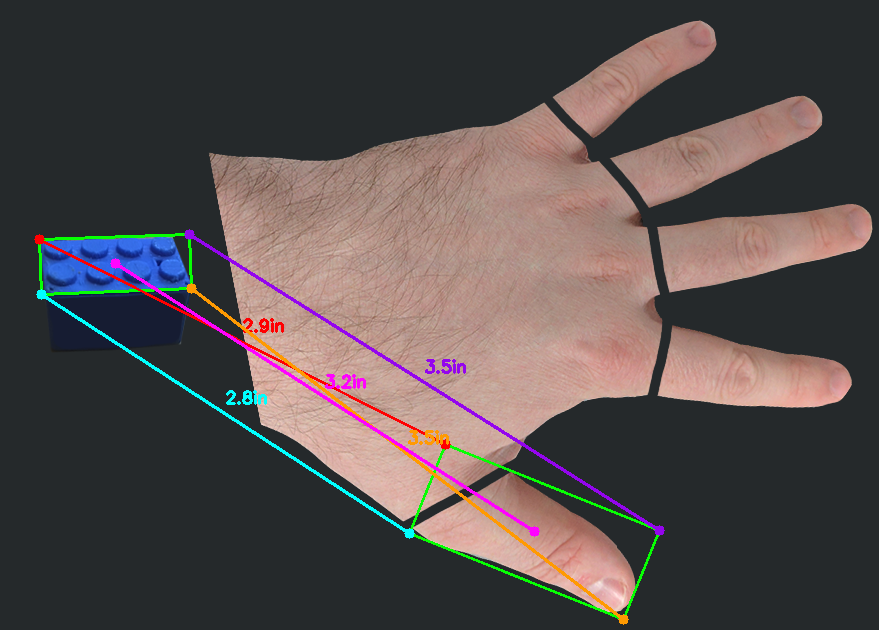
Below is an example of it using a bottle cap (estimated to be about 0.995inches) calculating the distance to the a hand.
Below are a list of the problems the current system has that will need to be addressed of worked around.
Because the hand detected above is considered a single contour it gives us a box that isn’t particularly useful, as not of the points it gives us distances for are in helpful places. The center point is also off due to the thumb extending the box out to the right.
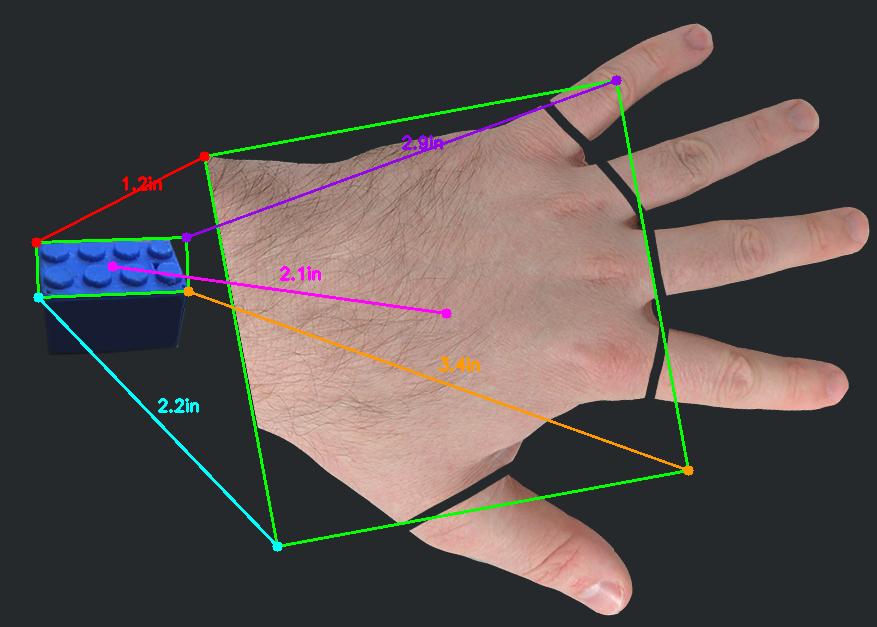
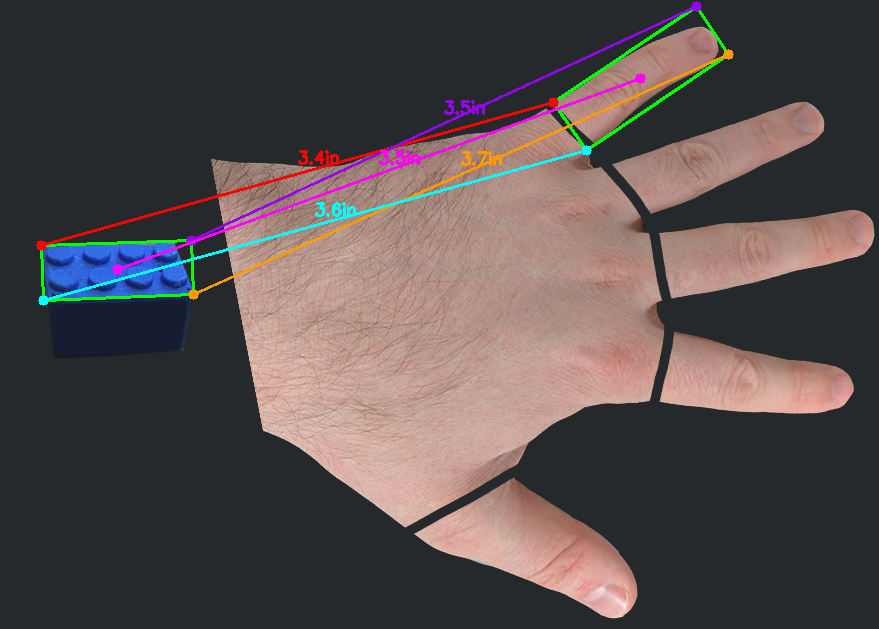
In order to test how well it handles multiple points, I had to cheat a little bit for now and just cut a line at the base of each finger to convince the program that the handle is made up of six pieces.
The results can be seen below and clearly offer much more usable information:
This issue is the biggest drawback of using this method, mainly because it limits our systems use to situations where the hand is flat and the camera processing the hand is directly or atleast really close to 90 degrees from the hands plain. The image below displays what I mean:
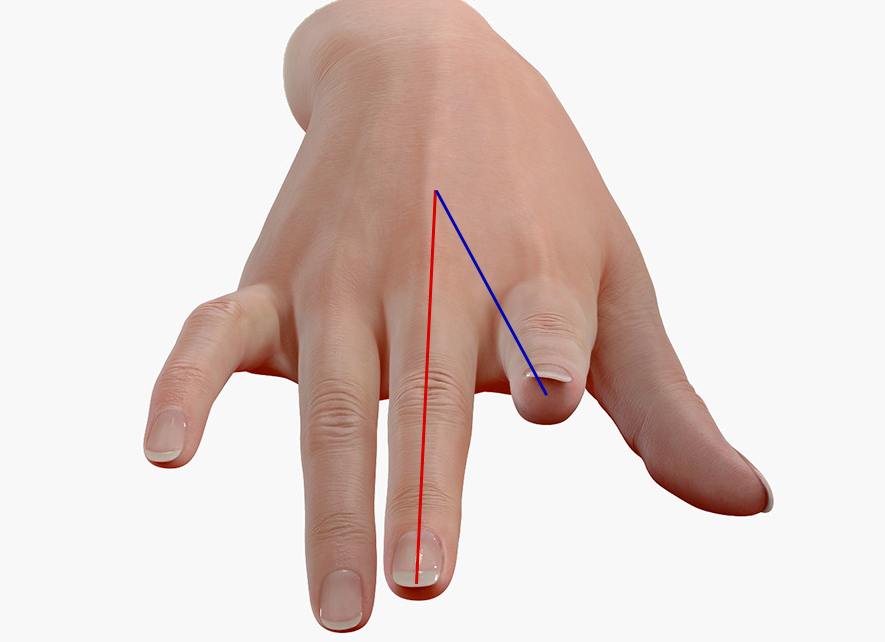
The index finger and middle finger of the model should be fairly similar in length on a typical hand, however they would be measured and return a result that has the index finger being atleast half the size purely because of the angle at which we’re capturing the hand at.
Measuring size of objects in an image with OpenCV - http://www.pyimagesearch.com/2016/03/28/measuring-size-of-objects-in-an-image-with-opencv/