Introduction
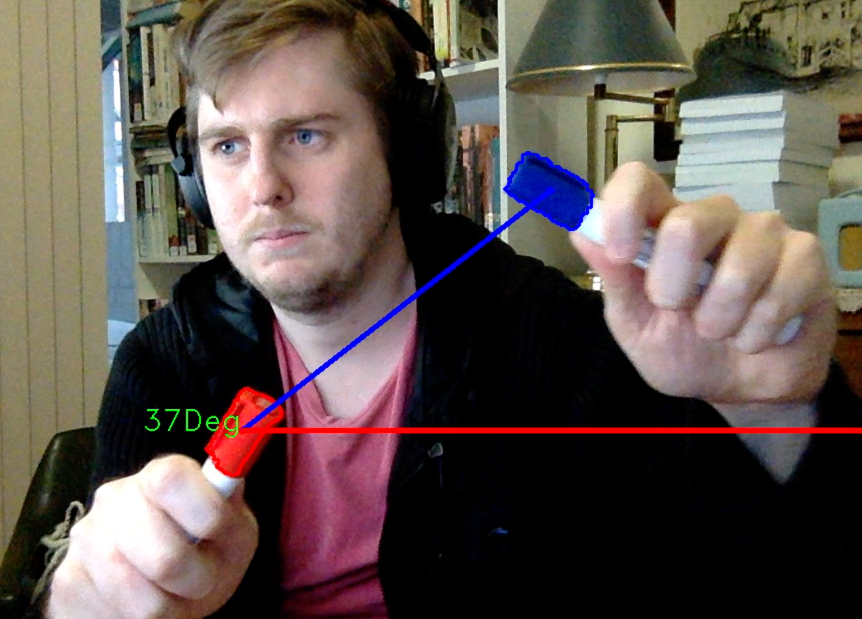
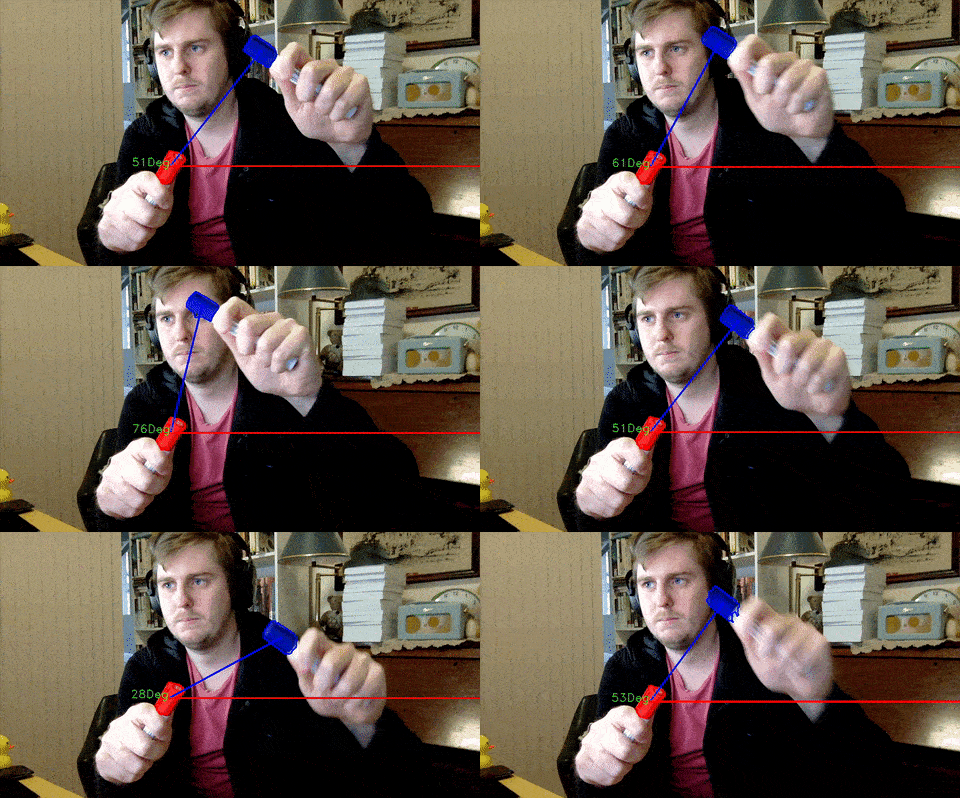
Today I set to work on the Angle mapping process of my project. The goal for today was to have two objects detected then to draw a straight line between them and calculate the resulting angle.

The work done in this section will hopefully be very fundamental to the problem I’m looking to solve, so I tried to keep as much of it documented as possible.
Final Code
I’d like to start this post by displaying the result and also linking the repo that houses the final code used for this solution:

Repo: https://github.com/HandMap/openCVAngleTracking
#include<opencv2/core/core.hpp>
#include<opencv2/highgui/highgui.hpp>
#include<opencv2/imgproc/imgproc.hpp>

#include <iostream>
#include <math.h>

namespace cv
{
    using std::vector;
}

#define PI 3.14159265

int main(int, char**)
{
    cv::VideoCapture cap(0); // open the default camera
    if(!cap.isOpened())  // check if we succeeded
        return -1;

    cv::Mat image_HSV;
    cv::Mat image_Color1;
    cv::Mat image_Color2;
    cv::Moments moments_color1;
    cv::Moments moments_color2;

    cv::vector<cv::vector<cv::Point> > contours_1;
    cv::vector<cv::vector<cv::Point> > contours_2;
    cv::vector<cv::Vec4i> hierarchy_1;
    cv::vector<cv::Vec4i> hierarchy_2;

    cv::Scalar color_1 = cv::Scalar( 255, 0, 0 );
    cv::Scalar color_2 = cv::Scalar( 0, 0, 255 );
    cv::Mat image_frame;
    cv::namedWindow("Angles",0);

    std::string point1;
    std::string point2;

    cv::Point center_1;
    cv::Point center_2;
    for(;;)
    {

        cap >> image_frame; // get a new frame from camera
        if (image_frame.empty()) break;

        // Generates HSV Matrix
        cv::cvtColor(image_frame,   // Input image
                     image_HSV, // output image in HSV
                     CV_BGR2HSV); // constant refering to color space transformation

        //filtering image for colors
        cv::inRange(image_HSV, //input image to be filtered
                    cv::Scalar(110,50,50), //min thresshold value
                    cv::Scalar(130,255,255), // max threshold value
                    image_Color1); //output image

        cv::inRange(image_HSV, //input image to be filtered
                    cv::Scalar(0,150,150), //min thresshold value
                    cv::Scalar(10,255,255), // max threshold value
                    image_Color2); //output image

        /// Find contours
        findContours( image_Color1, // input image
                      contours_1, // vector to save contours
                      hierarchy_1,
                      CV_RETR_TREE,
                      CV_CHAIN_APPROX_SIMPLE,
                      cv::Point(0, 0) );

        findContours( image_Color2, // input image
                      contours_2, // vector to save contours
                      hierarchy_2,
                      CV_RETR_TREE,
                      CV_CHAIN_APPROX_SIMPLE,
                      cv::Point(0, 0) );


        // Get the moments
        cv::vector<cv::Moments> mu_1(contours_1.size() ); // initialize a vector of moments called mu, vector size the number of contours
        for( int i = 0; i < contours_1.size(); i++ )
        { mu_1[i] = moments( contours_1[i], false ); }

        cv::vector<cv::Moments> mu_2(contours_2.size() ); // initialize a vector of moments called mu, vector size the number of contours
        for( int i = 0; i < contours_2.size(); i++ )
        { mu_2[i] = moments( contours_2[i], false ); }

        ///  Get the mass centers:
        cv::vector<cv::Point2f> mc_1(contours_1.size()); //vector to store all the center points of the contours.
        for( int i = 0; i < contours_1.size(); i++ )
        { mc_1[i] = cv::Point2f( mu_1[i].m10/mu_1[i].m00 , mu_1[i].m01/mu_1[i].m00 );}

        cv::vector<cv::Point2f> mc_2(contours_2.size()); //vector to store all the center points of the contours.
        for( int i = 0; i < contours_2.size(); i++ )
        { mc_2[i] = cv::Point2f( mu_2[i].m10/mu_2[i].m00 , mu_2[i].m01/mu_2[i].m00 );}


        /// Draw contours

        for( int i = 0; i< contours_1.size(); i++ )
        {
            if  (mu_1[i].m00>1000){
                center_1=mc_1[i];

                drawContours( image_frame, contours_1, i, color_1, 2, 8, hierarchy_1, 0, cv::Point() );
                circle( image_frame, mc_1[i], 4, color_1, -1, 8, 0 );

                //std::cout<< "red pen: " <<mc[i] << '\n';
            }

        }
        for( int i = 0; i< contours_2.size(); i++ )
        {
            if  (mu_2[i].m00>1000){
                center_2=mc_2[i];
                drawContours( image_frame, contours_2, i, color_2, 2, 8, hierarchy_2, 0, cv::Point() );
                circle( image_frame, center_2, 4, color_2, -1, 8, 0 );

                line(image_frame,center_2,center_1,color_1,4,8,0);
                cv::putText(image_frame, (std::to_string(int(atan ( (abs(center_1.y-center_2.y)*1.0 /(center_1.x-center_2.x)*1.0))*(180.0/PI))) + "Deg"), (center_2 + cv::Point(-100,0)),CV_FONT_HERSHEY_DUPLEX,1,cv::Scalar(0,255,0),1,8);
                line(image_frame,center_2,cv::Point(image_frame.cols,center_2.y),color_2,4,8,0);


            }

        }
        std::cout <<"Point 1" <<center_1 <<",  Point 2"<< center_2
                  << "  angle :" <<atan ( (abs(center_1.y-center_2.y)*1.0 /(center_1.x-center_2.x)*1.0))*(180.0/PI)
                  <<'\n';
        cv::imshow("Angles", image_frame);

        if(cv::waitKey(30) >= 0) break;
    }
    // the camera will be deinitialized automatically in VideoCapture destructoratan
    return 0;
}
Code Breakdown
Let’s break down each section of the code to get a better understanding of what’s going on.
Imports
#include<opencv2/core/core.hpp>
#include<opencv2/highgui/highgui.hpp>
#include<opencv2/imgproc/imgproc.hpp>

#include <iostream>
#include <math.h>
The first thing we do is import all the necessary libraries. This includes the three main opencv2 c++ libraries and also iostream and maths.
Namespace
namespace cv
{
    using std::vector;
}
One of the standard vector libraries used in this code needs to be defined in the main namespace.
Define Pi
#define PI 3.14159265
Later on in the code we use the ‘Pi’ constant; whilst I could use the one defined in the standard maths library, It is declared manually to give the reader the best idea about what is going on.
Declare variables
int main(int, char**)
{
    cv::VideoCapture cap(0); // open the default camera
    if(!cap.isOpened())  // check if we succeeded
        return -1;

    cv::Mat image_HSV;
    cv::Mat image_Color1;
    cv::Mat image_Color2;
    cv::Moments moments_color1;
    cv::Moments moments_color2;

    cv::vector<cv::vector<cv::Point> > contours_1;
    cv::vector<cv::vector<cv::Point> > contours_2;
    cv::vector<cv::Vec4i> hierarchy_1;
    cv::vector<cv::Vec4i> hierarchy_2;

    cv::Scalar color_1 = cv::Scalar( 255, 0, 0 );
    cv::Scalar color_2 = cv::Scalar( 0, 0, 255 );
    cv::Mat image_frame;
    cv::namedWindow("Angles",0);

    std::string point1;
    std::string point2;

    cv::Point center_1;
    cv::Point center_2;
- We begin the main loop and open the Video feed from the default camera.
- We declare a series of variables in preparation for use later on in the code. I’ll do my best to explain what each of the variable types are used for in a later section.
- We also open a new namedWindow with the title Angles.
Begin loop()
    for(;;)
    {
        cap >> image_frame; // get a new frame from camera
        if (image_frame.empty()) break;
We start the main loop of the program by first getting a new frame image from the camera feed. If the frame isn’t empty we continue.
Generate HSV Matrix
        cv::cvtColor(image_frame, // Input image
                     image_HSV, // output image in HSV
                     CV_BGR2HSV); // constant refering to color space transformation
We run the svtColor function over the image frame using the CV_BGR2HSV transformation method. The BGR2HSV transformation method takes a matrix in the native RGB order and converts it to its HSV equivalent. This is opposed to the standard RGB2HSV conversion that would require the input matrix be fed in in reverse order. example:
(R, G, B) -> (255, 0, 0) used with RGB2HSV would have to be stored as (0, 0, 255)
however when we use BGR2HSV we can store our RGB values in the typical (255, 0, 0) manner.
HSV inRange thresholds
        //filtering image for colors
        cv::inRange(image_HSV, //input image to be filtered
                    cv::Scalar(110,50,50), //min thresshold value
                    cv::Scalar(130,255,255), // max threshold value
                    image_Color1); //output image

        cv::inRange(image_HSV, //input image to be filtered
                    cv::Scalar(0,150,150), //min thresshold value
                    cv::Scalar(10,255,255), // max threshold value
                    image_Color2); //output image
We generate the threshold maps for each of the two colours using the cv::inRange() method. This takes an input image, followed by two Scalar colours that represent the minimum and maximum thresholds, and finally the output image pointer to store our map in.
Find contours
        /// Find contours
        findContours( image_Color1, // input image
                      contours_1, // vector to save contours
                      hierarchy_1,
                      CV_RETR_TREE,
                      CV_CHAIN_APPROX_SIMPLE,
                      cv::Point(0, 0) );

        findContours( image_Color2, // input image
                      contours_2, // vector to save contours
                      hierarchy_2,
                      CV_RETR_TREE,
                      CV_CHAIN_APPROX_SIMPLE,
                      cv::Point(0, 0) );
We use the findContours() method next and store the resulting contours in the contours_1, contours_2 vectors.
Find moments
        // Get the moments
        cv::vector<cv::Moments> mu_1(contours_1.size() ); // initialize a vector of moments called mu, vector size the number of contours
        for( int i = 0; i < contours_1.size(); i++ )
        { mu_1[i] = moments( contours_1[i], false ); }

        cv::vector<cv::Moments> mu_2(contours_2.size() ); // initialize a vector of moments called mu, vector size the number of contours
        for( int i = 0; i < contours_2.size(); i++ )
        { mu_2[i] = moments( contours_2[i], false ); }
We initialize two vector of moments for each colour point and move all our contour points into the moment vectors.
Find mass centers
        ///  Get the mass centers:
        cv::vector<cv::Point2f> mc_1(contours_1.size()); //vector to store all the center points of the contours.
        for( int i = 0; i < contours_1.size(); i++ )
        { mc_1[i] = cv::Point2f( mu_1[i].m10/mu_1[i].m00 , mu_1[i].m01/mu_1[i].m00 );}

        cv::vector<cv::Point2f> mc_2(contours_2.size()); //vector to store all the center points of the contours.
        for( int i = 0; i < contours_2.size(); i++ )
        { mc_2[i] = cv::Point2f( mu_2[i].m10/mu_2[i].m00 , mu_2[i].m01/mu_2[i].m00 );}
We find the mass centers of our contours that we plan to use use as a way to get the overall mass center of the largest coloured location
Draw contours
        for( int i = 0; i< contours_1.size(); i++ )
        {
            if  (mu_1[i].m00>1000){
                center_1=mc_1[i];

                drawContours( image_frame, contours_1, i, color_1, 2, 8, hierarchy_1, 0, cv::Point() );
                circle( image_frame, mc_1[i], 4, color_1, -1, 8, 0 );
            }
        }
        for( int i = 0; i< contours_2.size(); i++ )
        {
            if  (mu_2[i].m00>1000){
                center_2=mc_2[i];
                drawContours( image_frame, contours_2, i, color_2, 2, 8, hierarchy_2, 0, cv::Point() );
                circle( image_frame, center_2, 4, color_2, -1, 8, 0 );

                line(image_frame,center_2,center_1,color_1,4,8,0);
                cv::putText(image_frame, (std::to_string(int(atan ( (abs(center_1.y-center_2.y)*1.0 /(center_1.x-center_2.x)*1.0))*(180.0/PI))) + "Deg"), (center_2 + cv::Point(-100,0)),CV_FONT_HERSHEY_DUPLEX,1,cv::Scalar(0,255,0),1,8);
                line(image_frame,center_2,cv::Point(image_frame.cols,center_2.y),color_2,4,8,0);
            }
        }
The final part of this code is to:
- Draw all the contours to the final image frame
- Draw a line from the right of the frame to the center point of the second coloured object
- Draw a line from the center of the first coloured object to the center of the second object
- Calculate the resulting angle and draw it to the left of the second object.
Write debug to terminal
        std::cout <<"Point 1" <<center_1 <<",  Point 2"<< center_2
                  << "  angle :" <<atan ( (abs(center_1.y-center_2.y)*1.0 /(center_1.x-center_2.x)*1.0))*(180.0/PI)
                  <<'\n';
        cv::imshow("Angles", image_frame);

        if(cv::waitKey(30) >= 0) break;
    }
    return 0;
}
Finally we write the debug values out to the console and deal with the program termination key capture.
Variable Classes
Below is a brief overview of the Variable classes used in the code described above.
cv::Mat
N-dimensional dense array class. This structure will be used to store the matrix representation of the images.
cv::Moments
The Definition of moments in image processing is borrowed from physics. Assume that each pixel in image has weight that is equal to its intensity. Then the point you defined is centroid (a.k.a. center of mass) of image.
We will be using these Moments variables to store the computational results when finding our HSV detections.
cv::Point
A point is simply a 2 dimensional x,y location in our image matrices
cv::Vec4i
The Vec class is commonly used to describe pixel types of multi-channel arrays.
cv::Scalar
Being derived from Vec<Tp, 4>, Scalar and Scalar can be used just as typical 4-element vectors. In addition, they can be converted to/from CvScalar. The type Scalar is widely used in OpenCV to pass pixel values.
We use the Scalar structures to store RGB and HSV colour values.
Conclusion
At this point in time I’m at a good place with this project and am ready to move onto working with the two sensor box colours on a hand model.
I’ll be tackling this task ASAP.
References
Understanding Moments in OpenCV - http://stackoverflow.com/questions/22470902/understanding-moments-function-in-opencv
Basic OpenCV Structures - http://docs.opencv.org/2.4/modules/core/doc/basic_structures.html
Scalar - http://docs.opencv.org/java/2.4.9/org/opencv/core/Scalar.html
Measuring angles in OpenCV - http://www.pdnotebook.com/2012/07/measuring-angles-in-opencv/
measuring angle in opencv c++ - https://sites.google.com/site/javiereperez1992/projects
OpenCV Changing Colorspaces - http://docs.opencv.org/trunk/df/d9d/tutorial_py_colorspaces.html
Twitter Facebook Google+